


Setting up an automated watering schedule is one of the easiest ways to keep your garden healthy while cutting down on wasted water. Learning how to set a garden hose timer removes the guesswork from daily irrigation, whether you are maintaining raised vegetable beds, establishing new grass seed, or keeping container plants hydrated during hot summer afternoons. When programmed properly, an outdoor water timer delivers the right amount of moisture at consistent intervals, protecting plants from drought stress and preventing runoff caused by overwatering.
This guide helps beginner gardeners, busy homeowners, and anyone managing home irrigation systems choose the right scheduling method and master their equipment. In this evaluation guide, 0 standalone timer units were provided in our current product catalog, meaning our focus is explaining universal programming steps, core interface mechanisms, and practical troubleshooting that apply to standard mechanical, digital, and multi-zone models. For broader equipment advice across spigots, soaker hoses, and drip emitters, explore our detailed guides in Watering & Irrigation.
To get reliable performance from any outdoor timer, you need to understand four core parameters: clock time, start time, watering duration, and watering frequency. Overlooking simple details, such as setting an AM time instead of PM or skipping the rain delay function during wet weeks, can lead to parched roots or drowned garden beds. Following a step-by-step setup routine ensures your timer works properly from the first day you connect it to the outdoor spigot.
Practical How To Set A Garden Hose Timer Guide
Every garden hose timer operates on the same core principle: an internal valve opens at a predetermined time and remains open for a set duration before shutting off automatically. However, the physical controls vary significantly depending on whether you are using a basic mechanical dial, a digital multi-function unit, or an app-connected model. Understanding how your specific model operates ensures you program it correctly and avoid unexpected flooding or dry soil.
Understanding the Three Main Timer Types
Mechanical timers are the simplest options available. They function like an analog kitchen timer with an internal spring mechanism. You twist the dial to your desired run duration, typically between 15 and 120 minutes, and the internal valve shuts when the dial returns to zero. These units require no batteries, making them reliable for quick, single-instance watering. However, they do not cycle automatically and must be reset manually every time you water.
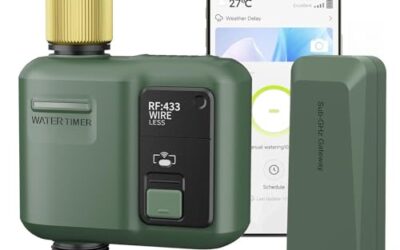
Digital timers are the most popular choice for home gardens. Powered by standard alkaline batteries, they feature an LCD screen with buttons or a central selection dial. They allow you to set specific start times, precise run durations, and automated frequencies such as every 12 hours, daily, or every few days. For gardeners seeking remote scheduling or automatic weather tracking, a modern best Wi-Fi water timer for garden hose offers smart integration through smartphone applications.
Step-by-Step Programming for Digital Single-Dial Timers
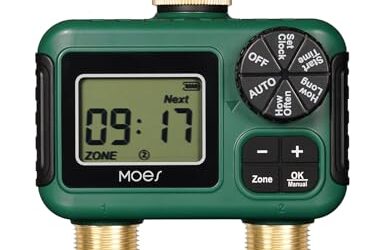
Most digital timers use a central rotating dial that moves through standard setup steps. To program one of these units correctly, follow this sequence:
- Set the Current Clock: Turn the dial to Set Clock or Time of Day. Use the plus and minus buttons to select the current hour and minute, confirming whether the clock is set to AM or PM.
- Set the Start Time: Rotate the dial to Start Time. Choose the specific time of day you want water to begin flowing. Early morning, between 5:00 AM and 8:00 AM, is ideal for most plants because it minimizes evaporation and fungal growth.
- Set How Long (Duration): Move the dial to How Long or Run Time. Adjust the minutes or hours to match your system. Drip irrigation lines typically require 30 to 60 minutes, while overhead sprinklers often need only 15 to 25 minutes.
- Set How Often (Frequency): Rotate the dial to How Often. Select your schedule, such as every day, every second day, or specific days of the week.
- Engage the Schedule: Turn the dial back to the Auto or Run position. The timer will not execute your program if left on any configuration setting.
Configuring Multi-Zone and Dual-Outlet Models
Dual-outlet and four-outlet timers allow you to run multiple garden zones from a single outdoor spigot. For instance, you can dedicate one port to raised vegetable beds that require daily hydration and another port to an oscillating lawn sprinkler that runs twice a week. If you manage mixed garden spaces, a dedicated dual outlet hose timer provides independent scheduling for each zone without requiring extra plumbing lines.
When programming a multi-zone timer, look for a Zone button or toggle switch on the interface. Always program Zone 1 completely through start time, duration, and frequency before switching to Zone 2. Be mindful to stagger your start times so both zones do not run simultaneously. Opening two valves at the exact same moment splits your water pressure in half, which often leaves neither sprinkler with enough force to throw water properly.
Tailoring Watering Schedules to Plant Needs
A timer is only as effective as the schedule you program into it. Different plant groupings require tailored watering durations and frequencies to develop deep, healthy root systems:
| Garden Area | Recommended Frequency | Recommended Duration | Best Practice Note |
|---|---|---|---|
| Vegetable Raised Beds | Daily or every other day | 30 to 45 minutes (drip) | Keep root zones evenly moist to avoid blossom end rot. |
| Established Turfgrass | 2 to 3 times per week | 20 to 30 minutes (sprinkler) | Deep, infrequent watering encourages deep turf roots. |
| Potted Patio Containers | 1 to 2 times daily in midsummer | 5 to 10 minutes (micro-spray) | Small soil volumes dry out rapidly under direct sun. |
| Perennial Borders & Shrubs | 1 to 2 times per week | 45 to 60 minutes (soaker hose) | Deliver water low to the soil line under mulch layers. |
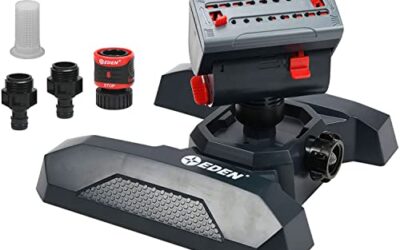
When watering turf or perimeter strips, matching the timer runtime with an appropriate distribution tool is essential. If you water specialized turf shapes, pairing your timer with the best sprinkler for narrow lawn ensures uniform coverage without soaking sidewalks or fences.
Using Rain Delay and Manual Bypass Modes
Two of the most valuable yet underused features on digital timers are the Manual button and the Rain Delay function. The Manual button opens the internal solenoid valve immediately for a temporary period without altering your programmed schedule. This lets you fill a watering can, wash garden tools, or run an extra cycle on an unusually hot day. Once the manual run ends, the timer automatically returns to its standard schedule.
The Rain Delay button pauses the programmed timer cycle for 24, 48, or 72 hours when rain is forecasted. Once the selected delay period expires, the timer resumes its regular program without requiring you to re-enter clock or runtime settings. Using this feature prevents soggy soil and stops water waste during rainy weather.
Preventing Leaks and Relieving Spigot Strain
Water timers are subject to constant water pressure because the spigot remains turned on continuously. To prevent leaks at the spigot connection, always inspect the black rubber or silicone washer inside the female inlet coupling of the timer. If the washer is cracked, compressed, or missing, the connection will spray or drip constantly under pressure.
Avoid over-tightening plastic timer collars with wrenches, which can crack the plastic threads and cause permanent leaks. Hand-tighten firmly instead. If your timer supports heavy garden hoses or multi-way splitters, the downward leverage can bend the spigot or crack the timer casing. Installing a short 12-inch hose extension or a brass elbow adapter between the spigot and the timer relieves that downward mechanical strain.
Battery Selection and Maintenance
Digital timers rely on battery power not just to illuminate the LCD screen, but to generate the mechanical pulse that opens and closes the internal motorized ball valve or solenoid. Always use fresh, high-quality alkaline batteries from trusted brands. Avoid rechargeable batteries, which produce a slightly lower nominal voltage (1.2V compared to 1.5V for standard alkaline cells) and may lack the torque needed to latch the valve shut under high water pressure.
Replace batteries at the beginning of each gardening season, even if the battery indicator still shows power. If batteries run out while the valve is open, some timers fail to close, causing water to run continuously until you notice the issue. Premium timers include a low-battery fail-safe that automatically shuts the valve and locks the unit when power drops below safe operating limits.
Winterization and Off-Season Storage
Freezing temperatures are the leading cause of hose timer failures. Water trapped inside the valve body expands when it freezes, cracking internal plastic chambers and ruining the pressure seal. As soon as nighttime temperatures approach freezing in the autumn, disconnect the timer from the spigot.
Once removed, shake out any residual water, open the manual valve briefly to ensure internal chambers are clear, and remove the batteries. Storing the unit indoors with batteries removed prevents terminal corrosion during the damp winter months. Keep the unit in a climate-controlled shed, basement, or garage until spring frosts have passed.
Research Methodology and Trust
At Dove Creek Gardens, our product evaluation process relies on systematic technical analysis, manual reviews, and real gardener feedback rather than simulated commercial claims. For this setup guide updated in September 2026, our editorial team reviewed technical documentation, manufacturer operating manuals, and user maintenance records across major outdoor irrigation brands to identify universal programming workflows and common failure points.
We do not claim hands-on destructive testing or artificial lab verification when documenting general operating procedures. Instead, our conclusions are drawn from manufacturer specifications, mechanical valve schematics, and thousands of verified owner experiences. This allows us to provide clear, reliable advice on thread compatibility, battery longevity, water pressure requirements, and winter survival.
Our focus when analyzing watering controllers centers on real-world practicalities: screen readability in direct sunlight, dial resistance, intuitive button layouts, fail-safe valve shutoffs, and ease of battery replacement. For gardeners who frequently travel or need complete automation without daily oversight, we evaluate these criteria closely in our overview of the best automatic watering system for vacation.
Frequently Asked Questions
Why is my garden hose timer not turning off automatically?
A timer that fails to shut off is usually caused by weak batteries, low water pressure, or debris inside the valve. Solenoid valves require an electrical pulse from the batteries and adequate water pressure to snap shut. If the batteries are low or silt is lodged in the diaphragm, the valve remains stuck open. Check the inlet filter screen and replace the batteries with fresh alkaline cells.
How long should I set my garden hose timer to run?
Run times depend on your watering delivery system and plant types. Standard lawn sprinklers typically need 20 to 30 minutes per session to soak the root zone without creating runoff. Low-flow drip irrigation lines and soaker hoses generally run for 30 to 60 minutes because they release water at a much slower rate. Always check your soil moisture 2 inches down to verify if adjustments are needed.
Can I connect a garden hose timer to a rain barrel?
Most standard digital timers require a minimum water pressure of 10 to 15 PSI to operate their internal diaphragm valves. Because gravity-fed rain barrels deliver very low pressure, standard timers will fail to open or close properly. You must use a specialized zero-pressure ball-valve timer designed specifically for gravity systems, as highlighted in our guide to the best rain barrel for small garden.
Do garden hose timers reduce water pressure?
Yes, hose timers introduce a slight restriction to water flow because water must pass through an internal valve orifice that is smaller than a standard garden hose diameter. While this minor reduction rarely impacts drip irrigation systems or soaker hoses, it can slightly reduce the maximum spray distance of large impact or oscillating sprinklers.
How often do I need to change the batteries in my hose timer?
Quality alkaline batteries generally last 6 to 12 months under normal operating conditions. However, high-cycle setups running multiple times per day or units with backlit screens and Wi-Fi radios consume power faster. It is best practice to install a brand-new set of alkaline batteries at the start of every spring season to prevent unexpected valve failures.
What should I do if the timer screen is completely blank?
If the display is blank, first remove the battery tray and check for terminal corrosion or moisture inside the compartment. Clean any white mineral scale off the contacts with a dry cotton swab and install fresh alkaline batteries, paying close attention to polarity. If the screen remains unresponsive after a battery reset, the internal circuitry has likely suffered water ingress or sun damage.
Continue your garden research
Browse more practical guides in Watering & Irrigation.
For product comparisons, see Best Drip Irrigation Kits for Raised Beds, Compared.
See how Dove Creek Gardens researches and compares products.